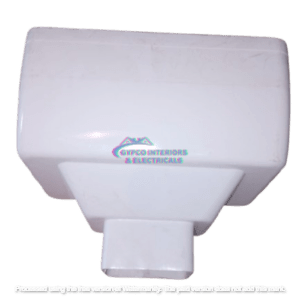
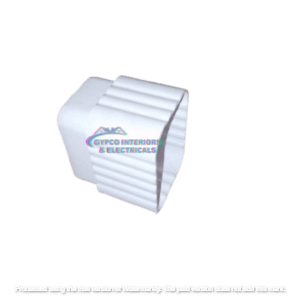
Gypco Interiors Limited

Sale!

Gutter Joiner

Original price was: KSh 500.00.Current price is: KSh 350.00.

A Gutter Joiner is an essential accessory used to connect two sections of guttering, ensuring a secure and leak-proof seal. Made from durable materials like aluminum or PVC, gutter joiners provide a smooth, reliable connection that helps direct rainwater flow efficiently, preventing leaks and water damage. Easy to install, they are ideal for both residential and commercial gutter systems, ensuring long-lasting performance and protection for your property.

Category:

A gutter joiner is a component used to connect two pieces of guttering, ensuring that water flows seamlessly through the system and preventing leaks at the joints. It’s an essential part of a gutter system, especially when installing a new setup or repairing an existing one. Here’s a detailed process of how to install and how it works:

1. Gather Necessary Tools and Materials

  • Gutter joiners (properly sized for your gutters)
  • Gutters (sections that need to be joined)
  • Downspouts
  • Sealant (optional)
  • Measuring tape
  • Hacksaw or tin snips (for cutting gutters)
  • Screws or rivets
  • Drill with a screwdriver attachment
  • Ladder
  • Safety equipment (gloves, goggles)

2. Preparation

  • Measure the gutters to determine where the joiner will go. This is important to ensure proper alignment and that the gutters fit together tightly.
  • If you have sections of gutter that need to be cut, measure and mark the cutting line using a tape measure and a pencil or marker.

3. Cutting the Gutter (If Needed)

  • Use a hacksaw or tin snips to cut the gutters to the appropriate length if necessary. Be sure to make a clean cut to avoid any gaps at the joints.
  • Smooth the edges of the cut areas to prevent damage to the joiner and to ensure a better seal.

4. Installing the Gutter Joiner

  • Position the joiner: Insert the gutter joiner at the end of one section of gutter, making sure it fits snugly.
  • Align the gutters: Slide the other section of gutter into the other end of the joiner.
  • Seal the connection: If the joiner requires a sealant (some come pre-sealed), apply a bead of sealant around the edges where the two gutters meet to prevent leaks.
  • Secure the joiner: Depending on the type of joiner, you may need to drill holes and secure the joiner with screws or rivets. This ensures that the joiner holds the two gutter sections firmly together and that the system is secure.

5. Attaching Downspout (Optional)

  • If the section of the gutter is connected to a downspout, make sure that the downspout section aligns properly with the gutter, and use screws or rivets to secure it to the gutter system.
  • Ensure the water will flow toward the downspout with no obstruction.

6. Test the Installation

  • Once the joiner is in place and everything is secured, test the gutter system by pouring water into the gutter sections.
  • Check for any leaks or areas where water might not be flowing properly.
  • Adjust the position of the joiner or tighten screws as needed.

How the Gutter Joiner Works

  • The gutter joiner serves as a connector between two sections of the gutter. It ensures that the water flows continuously without leaks from one section to another.
  • It’s typically water-tight, either with a rubber seal or silicone-based sealant, and helps to keep water from leaking at the connection point, preventing potential water damage to the building’s foundation or exterior.
Shopping Cart